What’s For Dinner? – Coconut Calamari & Shrimp with Mashed Rutabaga and Butternut Squash over Arugula


PaleoCalamari

My wife and I took a trip over to Washington DC this past weekend, hoping to catch the first couple of Cherry Blossoms peaking out of their buds for some spring sunshine. We were in luck, because that is exactly what we got! We saw about 2 trees which were fully in bloom. They probably had the perfect amount of sun exposure, through the tall buildings, and just the right amount of root-warming from the sidewalks in front of them. They were gorgeous! I love cherry-blossom festivals, and the other spring flower festivals that happen all over the country!

It’s a long drive home from DC. With traffic, it took us about 5 and a half hours, and the driving was not fun. Half the time we were cruising along, light traffic, good speed. The other half the time we were caught up in bumper-to-bumper, 25mph creeping traffic, on a 4-lane highway. And there is nothing I want more when I get home from something like that than some quality comfort food! I was seriously craving my White Wine Coconut Shrimp – but it was not to be… I was out of shrimp. Fortunately, I had a mixed bag of frozen wild-caught calamari and shrimp which I had been saving for just this sort of occasion!

What you’ll need:

  • Shrimp and Calamari
  • 1 pound wild uncooked calamari (or the calamari and shrimp mix which I used)
  • 3 tablespoons coconut butter
  • 1 tablespoon Italian seasoning (or the constituent ingredients)
  • 1 teaspoon salt
  • Mashed Rutabaga and Butternut Squash
  • 1 rutabaga, chopped
  • 1/2 butternut squash, cubed (1/2 inch cubes)
  • 2 tablespoons coconut butter
  • 2 tablespoons crushed walnuts (pecans work too)
  • 1 tablespoon Italian seasoning
  • 1 tablespoon coconut oil

Start the Butternut Squash first. The whole meal takes a bit of preparation, but it’s worth every minute of it! First cube the Butternut Squash, put them on an oiled baking sheet (this is where you use the coconut oil) and lightly season them with the Italian seasoning. You may like to add salt and pepper to this as well, but do it for flavoring purposes, and keep it light and even. Put these in the oven on 250 for 60 minutes.

After 35 minutes of bake time, start the Mashed Rutabaga. Chop this up as finely as you can stand and put it in a pot. With the rutabaga in the pot, fill with water up to the top of the rutabaga, add the coconut butter, and turn it on high. If the rutabaga is pre-chopped, start this process about 20 minutes before the butternut squash is finished, or after 40 minutes of bake time.

Once the Rutabaga is cooking, start the Shrimp & Calamari. I used a 1 pound bag, and this was good for about 2 servings. Empty the bag in to a large sauce pan, add the seasoning and coconut butter, turn the heat on high and cook, covered, for 10 minutes.

About 5 minutes before the Butternut Squash is finished, stir both the Shrimp & Calamari and the Rutabaga. Things are going to happen fast now, so keep on your game! Leave the Shrimp and Calamari uncovered. Now is the time when we want the liquid in the pot to boil off, leaving the coconut butter and the spices behind to stick to the shrimp and calamari. The flavor you will get from the coconut butter, the spices, and the wild-caught seafood is a great combination of the fresh, crisp seafood flavor with the thick rich flavor of the coconut butter and Italian seasoning. Mash the rutabaga at about 2-3 minutes remaining on the bake clock. You’ll want this to be pretty well mashed, so take your time.

As soon as the Butternut Squash is finished, add it to the mashed Rutabaga, as well as the crushed walnuts, and stir thoroughly. Give this another 2-3 minutes of cook time before serving. While it’s in the final phase of cooking, make sure that the Shrimp and Calamari are being stirred regularly, and don’t get stuck to the pan. You can turn the heat down at this point, if it helps. And this is the time to get the plates ready, and put down the bed of Arugula.
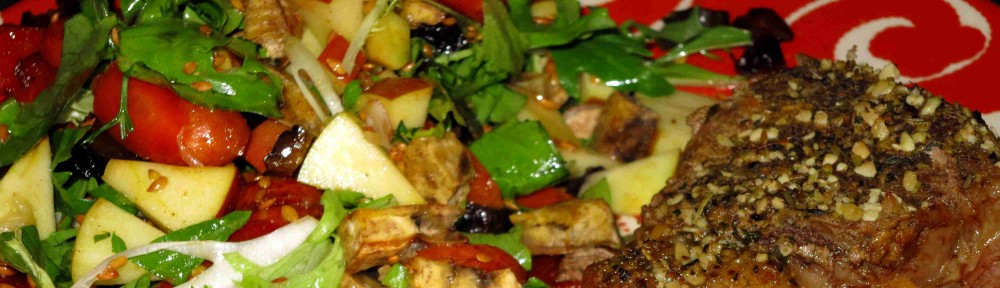
Serving:

I know this is takes a bit of prep time, and it’s an involved meal to make, but trust me when I tell you: It’s worth it! As I said above: put the arugula down first. I didn’t put any dressing on the arugula. Now serve the rutabaga and butternut squash over the arugula, and the shrimp and calamari along side.

PaleoCalamari1

And enjoy! For other “What’s For Dinner?” Meals, check back daily to Urban Paleo Chef!

Trying New Things


HuKitchen-32113-Venison

Once you find a place that you trust, a place with excellent quality food, and the highest quality standards for their meals, it’s great to step outside of your comfort zone! Common “stretch” meals among people I know could include Beef Tartar, Beef Carpaccio, Tuna Tartar, etc. Where the “stretch” is to eat something prepared in an entirely unfamiliar way for your palate. You could also experiment with spices, heat, cold (gazpacho anyone?), or even preparation styles like the Molecular Gastronomy which is becoming quite popular here in the NYC area. I love to “stretch” my palate, but being a Paleo eater, I also recognize the importance of taking extreme care with your stretch choices, and just as importantly: the preparing chef.

Being perfectly honest, I’ve been preparing and sharing some of my best and most delightful meals here on urbanpaleochef.com, but none of them have been “stretch” meals for my palate. That is, until recently, when I made the Quick Chicken Tagine which I shared this week. I loved stretching my palate with the powerful lime flavoring, and the spice of the extra ginger in the dish. It was a delight for me! So last night my wife and I headed to Hu Kitchen expressly to stretch our palates! We were headed there to try out the Antellope Burgers that they’ve been featuring on their Thursday Night Happy-Hour menu. Unfortunately, they were out by the time we arrived, but we were there to “stretch” – and “stretch” we did!

Cervena Venison, Roasted Butternut Squash, Coconut Button Mushrooms

I am no stranger to Venison, having grown up in northern Vermont. It’s certainly not as common as beef, but Venison is reasonably available, and anyone with a mind to try it will always be able to find a way. A neighbor, family friend, or even a local store will have some available during Venison season. I’ve had Venison burgers, Venison steaks, Venison sausages… I’ve tried most of the major ways to serve meat with Venison as the “meat” of the meal. And I really enjoy Venison! Unlike with beef, however, I have never tried Venison with a carpaccio style meal: cold, mostly raw. That was a “stretch” for us – and it was totally worth it!

So get out there, go to your “safe” restaurant, where you know they make great food, and try a “stretch” meal! You may not end up liking the food, and that’s ok! But you’ll enjoy the experience for sure! And if you’re in the NYC area – Hu Kitchen is about as good a “stretch” restaurant as I could ask for!

HuKitchen-32113-RotisseryChicken

UPC’s Hot & Cold Salad – To Go


HotAndColdSalad-ToGo

“Ugh!” My wife said, noticing that I was taking a picture of the salad in their plastic containers. Her aesthetic sense was offended by the plastic – and I don’t blame her! “I just don’t like the plastic containers in the picture!” She finished her thought. “I know…” I replied, doing the best I could to take the least offending photograph I could take. She’s right, though. The plastic containers don’t photograph anywhere near as well as a well-manicured place setting. But they do the job, and in this case, they adequately show what job they do.

UPC’s Hot & Cold Salad – To Go

Today’s salad was delicious. I tried several new flavor combinations, and I think they worked out really well! Here’s what I did:

  • The Hot:
  • Smoked Pork Loin, chopped
  • Leeks, chopped
  • Button Mushrooms, chopped
  • The Cold:
  • Spring Mix Salad
  • White Button Mushrooms, chopped
  • Mango (skin on), chopped
  • Avocado, chopped
  • Dressing:
  • Hazelnut Oil

First start cooking the mushrooms and smoked pork loin in about 1 tablespoon of coconut oil. This is a small enough serving of oil that it should be entirely used by the cooking process. But large enough to keep the mushrooms from burning before the pork juices start to add to the oil. This is a home-made smoked pork loin, though it’s not the pork loin I made by accidentally smoking a roast in my slow-cooker – that recipe is on my list of recipes to work out, and get a finalized version to you all, and I can’t wait! No, this was smoked during my weekend with my parents in Vermont, and my father did a wonderful job creating his own version of Canadian Bacon!

As the pork and mushrooms heat up, chop the salad ingredients, and add them to your take-out container. This is the key to the “To Go” version of my Hot & Cold Salads – you have to keep them separated so that when you re-heat later, they will retain their unique flavors. Add all the cold parts to the “Cold” container, including the oil (it doesn’t “re-heat” well).

Turning your attention back to the pork and mushrooms: add the chopped leeks and turn the heat up to high. I would estimate that chopping the “Cold” portion should take about 5-10 minutes. This is the right amount of time for the pork and mushrooms to cook before adding the leeks, provided you’re using Canadian Bacon thickness pork loin. If your pork is thicker, you’ll have to cook longer. Cook the leeks with the pork and mushrooms on high for about 1 minute. Leeks don’t take long to cook, and you don’t want them over-done as it changes both the flavor and the texture.

Like with the “Cold” part, put the “Hot” part of your salad in it’s own container for re-heating later. I bring a separated Hot & Cold Salad for lunch 2-3 times per week, and it’s still excellent to re-heat the hot part, mix them, and eat a fresh Hot & Cold Salad, my own high quality food, my own recipe, in a cafeteria at work!

I’ve asked you to vote with your dollars, now I’m giving you a tool to help you do that. If you buy local and/or organic foods, and cook your own food at home, you are removing your lunch-money from the Fast-Food system. You’re sending a message, small as it may be, to the global food market that you want fresh, high quality, local foods. And you’re supporting that message, rather than sabotaging it, by bringing your own lunch. And more importantly, it’s delicious high quality food. How do you know? Because you made it yourself!!!

Enjoy!

Quick Chicken Tagine


ChickenTagine_Plated1

I was reading the recent Travel and Leisure – Food Edition and stumbled on a picture of a Chicken Tagine served at a gas station in Morocco. The picture caption indicated that it may be the best gas station food you will ever eat – and I believe it! Not wanting to wait for my next trip to Morocco for a delicious meal of what appeared to be an amazingly tasty dish, I studied the picture for a few minutes and then decided to recreate it. On review: it was totally worth it!!!

What you’ll need (my recipe):

  • 1.5 Pounds Chicken Thigh
  • 3 Limes, skin removed, chopped
  • The skin from the above limes, chopped
  • 2 Medium Onions, chopped
  • 1 12oz can of olives, drained (mixed is best)
  • Half the above can of olives hand-crushed
  • 1 Medium Mango, chopped
  • 1 Red Pepper, sliced
  • 2 Inches Ginger, sliced
  • 1 Cup Olive Oil (Extra Virgin)
  • Seasoning: Italian Seasoning, Cumin, Black Pepper, Sea Salt
  • Paprika or Cayenne optional

Prep and Cook time: 50 minutes
Serves 2

In a soup pot, add the chicken, spices, the chopped mango, the ginger, and the chopped lime (not the skin) with about 2 cups of water and turn on high heat to a rolling boil. Being honest, I put the water and chicken in first, turn the heat on, then add the spices while I am chopping all the other ingredients. As you may have seen from my About Me page, I do things as I go along… It just seems to work out for me, though I do occasionally forget ingredients. If you’re going to chop and prep as you go, add the lime first, since that flavor is the most important flavor. After the lime, slice up the ginger and add that. Then get around to the spices, and finally the mango, olives, and pepper. Cover this once all ingredients are added, turn the heat down so that the rolling boil continues, but it doesn’t boil over the pot, and leave it alone while you tend to the onion and lime peels.

ChickenTagine_CookingWhile the soup is heating up, chop up the lime peel (this can be done with lemon as well) and the onions and put them in a separate pan on high heat with about 1 tablespoon of coconut oil. Cover this initially to keep the liquid in while they’re heating up – this will speed up the process of caramelizing, and they will taste better that way. I like to use a long thin cut of onion and lime for this dish, rather than square cuts. It takes a bit of extra work, I think, but it’s worth it in the end. They’ll serve like small noodles, and I think they preserve their flavor better that way.

As soon as the pan starts to sizzle, turn the heat down and stir regularly. You want these to caramelize. The onions should turn brown, and a sweet smell should start to waft up from the pan. But you don’t want them to over-cook and burn to the side of the pan. This will be fine for the onions, mostly, but it will ruin the flavor of the lime peel. It’s very important that you take your time on this, and make sure that the lime peel doesn’t overcook.

ChickenTagine_CookedOnce the lime peel and onions have caramelized, add the olive oil and turn the heat down to low. As I mentioned above, it is very important that the lime peel not overcook. Adding the olive oil will slow the cooking process, but really what you want to do is infuse the flavors of the onions and lime in to the olive oil. Keep this on low heat and uncovered, letting any of the liquid in the pan evaporate.

Serving

About 5 minutes before serving, add the olive oil mixture to the tagine pot. This should be at about 45 minutes of cook time, and the pot should have a nice stew-coloring, and smell delicious! Let this cook for another 5 minutes with all ingredients combined. Serve in soup bowls.

ChickenTagine_Plated2

Mac And Cheese, UPC Style, Take One!


Close, but no cigar…

MacAndCheeseTake1_Plated

Looks right! Great color, great photographic texture… The flavor is close – really close. But I’m not there just yet. I will have to do some experimenting with spicing in order to land on this just right. And the texture is close too – but like the flavor, I’m not quite there yet.

Here’s what I did:

I used my recipe for Mashed Rutabaga as the “Cheese” portion. If you haven’t seen it yet, it consists of sliced rutabaga, finely diced ginger, and coconut cream all boiled down to the point where there’s no liquid left then mashed. It’s delicious! But not quite the right flavor. Not yet.

And for the Mac: I used carefully cut Rutabaga and Butternut Squash. I baked them for an hour at 200, hoping to mostly dry them out. Mimicking the actual chemical processes of Macaroni is quite challenging! I realize that we’re all quite used to simply buying it, opening the box, and using it… But it’s a highly complex, extremely processed food which is very very difficult to replicate using whole foods. But I am on the right track!!

Here are the pictures:

MacAndCheeseTake1_ButternutSquashUncutMacAndCheeseTake1_ButternutSquashCuttingTo the left is the butternut squash, cut, but not peeled or sliced yet. And to the right we have the peeled butternut squash, in the process of being cut up.

MacAndCheeseTake1_ButternutSquashBakingPanMacAndCheeseTake1_MacBakedTo the left is the butternut squash being put in the oven to bake the liquid out. And to the right I have added the rutabaga. Rutabaga kept it’s texture better than butternut squash.

MacAndCheeseTake1_CheesePreCookedMacAndCheeseTake1_CheeseTo the left is the mashed rutabaga, in it’s beginning stages. It’s one of my favorite side-dish recipes! To the left is the completed version. It really did come out great!

MacAndCheeseTake1_MacWithCheeseMacAndCheeseTake1_MacWithCheeseMixedTo the left is what the dish looked like as I added the mashed rutabaga “Cheese” to the top. I realized that I would have to mix it before baking – since it would not run/drip down and cover the macaroni.

MacAndCheeseTake1_Pre-BakedMacAndCheeseTake1_CookedOn the left is the picture of the mixed, ready-to-bake version with crushed walnuts sprinkled over the top. And on the right is the completed version. It came out looking great!

It tasted great too! All told, the final version was quite delicious, and there’s no reason for me to be less-than-pleased with how it turned out. Except that it’s not Mac&Cheese. While it’s an interesting dish, with interesting flavors, and interesting textures, it’s not what I was trying to do. And I will continue to work on that… A quick reminder of what the end goal is supposed to look like:

mac-and-cheese_608

I was close, right?!? But not quite there yet. It was a lot of work, and worth it. And I think I will be able to finalize the recipe on my next attempt! Stay tuned!!!

MacAndCheeseTake1_Plated